Posts

Showing posts with the label foil

Brutus Monroe Hop - January 2020 Subscription Items
Image
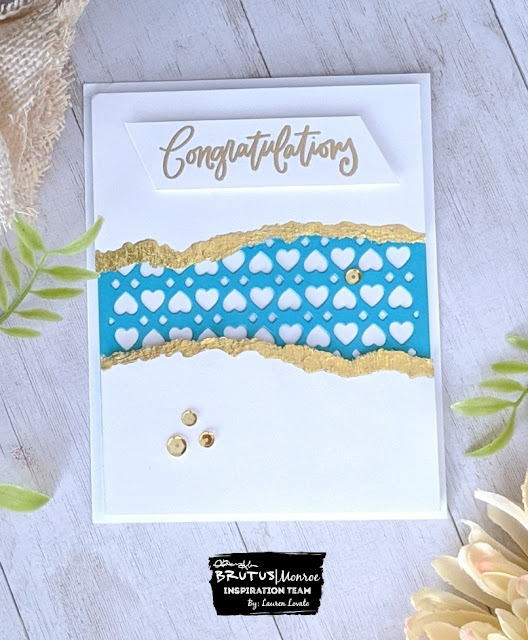
Hello crafty friends! Now that the dust has settled after the Christmas whirlwind, are you back to regular life again? The holidays always leave me feeling like I've forgotten how to function on a regular schedule! Today for the Brutus Monroe Inspiration Team blog hop we're showing some of the January subscription products. I chose to make this card using the die of the month! Thanks to a random conversation I had with my sweet friend Ann Corbiere-Scott, who is a talented stamp designer, I got looking at "Fault-line" cakes on instagram. I got lost down a spiral of pretty cake decorating videos, and now I've got them on the brain! They're gorgeous, and meant to look like two sides cracked in half with something cool inside (on the cakes, typically a pretty sprinkle mix!). So I decided to make a fault-line style card! I used the die of the month with some teal cardstock, and adhered it to a piece of Alabaster cardstock. I took another piece of Alabaster car...

Brutus Monroe Hop - Nontraditional Holiday

Image
Hello crafty friends! I'm excited to bring you this card today for the Brutus Monroe Inspiration Team "Nontraditional Holiday" blog hop! My sister-in-law loves anything with sugar skulls, and I always try to incorporate that into her birthday and holiday cards. This time I went BIG with this sugar skull that has a Christmassy crown and a dark snowy background! I started with a panel of Raven cardstock, and I flicked white acrylic paint all over the background for the snowy effect. Then I took one of the chipboard skulls and squished embossing ink all over the surface, and heat embossed three layers of Alabaster Sparkle EP. I adhered it to the background with foam tape. I stamped the rose image several times with Raven detail ink and colored them with alcohol markers. I fussy cut them out and used a black marker to go around the cut edge. I popped them up with different dimensions of foam tape and glue near the top of the skull. I used the DecoFoil pen to loosely cov...

Brutus Monroe Blog Hop - DecoFoil

Image
Hello crafty friends! Thanks for popping over to my blog today! It's Wednesday, which means blog hop day for the Brutus Monroe Inspiration Team. Today's theme is DecoFoil! Have you ever done any foiling? Brutus Monroe has partnered with ThermoWeb to create their own exclusive line of craft foils and printed toner sheets. If you've never heard of ThermoWeb, check them out on social media! They have a huge range of cool crafty products, and some amazing collaborations with some amazing companies in the craft industry. If you've followed my crafting for a while, you'll know that I love foiling! There's a common misconception about foiling, that you have to have a lot of equipment to use the foils. Not true! There are a lot of different ways to foil. Some of the products and techniques do require a laminator, but today I'll also give an example of a technique that does not require any machines. For this first card, I used silver sketch foil and strips...

Decorative Details - Brutus Monroe Inspiration Team Blog Hop

Image
Hi there crafty friends, thanks for joining me today! It's blog hop Wednesday for the Brutus Monroe Inspiration Team, and this week the theme is "Decorative Details". For my decorative details, I chose to use the clear acrylic bubbles and foil! I started with one of the new white "Ornamental" toner sheets, and sliced it into 4 equal panels. I ran one of them through the laminator with some of the new Gold Static foil, and trimmed it down. I used Rock Candy, Cabana and Locomotive surface inks to blend a blue icy background with a blending tool. After blending over the foiled images, I use a clean dry cloth to buff the panel, and it brings the shine of the foil back out. The foil resists the ink! I matted the panel first on a piece of Midnight yardstick and then a slightly larger piece of Gilded glitterstock. I heat embossed the sentiment from the "Oh Deer" stamp set with Gilded Sparkle EP onto a slice of midnight cardstock, and backed it with a lit...

Aqua Pigments - Brutus Monroe Inspiration Team Blog Hop

Image
Hello crafty friends! It's another blog hop Wednesday for the Brutus Monroe Inspiration Team, and this week were playing with Aqua Pigments! For those of you who don't know, aqua pigments are liquid watercolors and Brutus Monroe offers quite a selection of colors, including metallic collections. They also offer a subscription where you get one new exclusive color each month. I used a wet-on-wet technique for this background, and the colors Pink, Yellow-Orange and Gilded. I started by brushing the aqua pigment paper with clean water, and I dropped the Pink and Yellow-Orange aqua pigments directly onto the wet paper, which causes the color to "bloom". I used a heat tool to dry it, and then splattered those two colors along with the Gilded aqua pigment onto the paper. I dried it again with the heat tool. I used a fan-shaped paintbrush to gently brush DecoFoil Gel onto the edges of the painted area, and then ran it through the laminator with Champagne DecoFoil. This...

Brutus Monroe Blog Hop - May - Anything Goes

Image
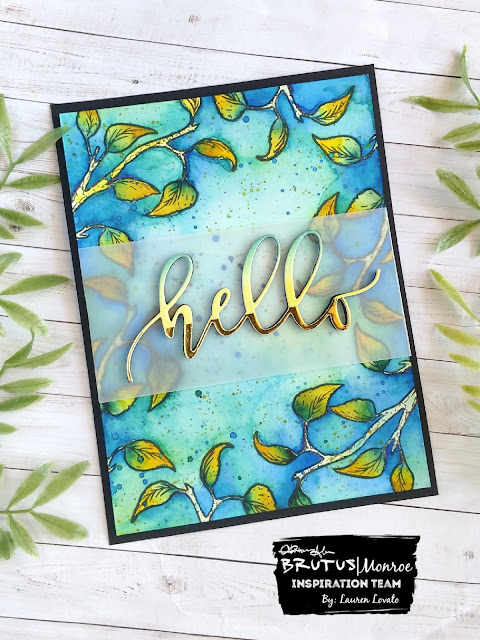
Hello crafty friends! Thanks for stopping by my blog. It's Wednesday, which is hop day for the Brutus Monroe Inspiration Team. This was an "anything goes" week, so we were free to do whatever we wanted! My project, to be honest, started out as a total hot mess! I used the branches from this month's inspiration box titled "Feathered Friends". The stamp set is really cute! It actually has a bird and birdcage theme, but I wanted to keep it simple and make a card with the branches.  So I started by stamping the branches around the edge of an aqua pigment paper panel (say that five times fast!) with Raven detail ink. I have been watercoloring a lot lately, but I typically heat emboss the image, which will contain the paint a lot, so this was where I went a little bit wrong. I mean, there's nothing WRONG with painted a stamped image, but since I'm used to the heat embossed images, the first leaves I painted flowed right outside the lines because I...

Brutus Monroe Hop - Foiling

Image
Hi crafty friends! Thanks for stopping by my blog. Today is Wednesday, which means Brutus Monroe Inspiration Team hop day...This week the theme is foiling! If you follow me on Instagram or Facebook, you'll have seen a lot of projects with foil. I love it! It adds such a wow factor to cards! There are a lot of ways to add foil to your cards, with or without a laminator. This project uses one of the new Brutus Monroe sketch foils and one of their laser cut mandalas! I started by cutting the giant mandala into 4 equal pieces using a paper trimmer. I sponged DecoFoil transfer gel generously all over the mandala section and left it to dry. While it was drying, I put a sheet of double sided adhesive onto a scrap of cardstock and then placed some of the silver sketch foil onto it, essentially making a piece of foiled carstock. I die cut the letters "hola" from that foiled cardstock.  When the mandala was dry, I ran it through my laminator twice with silver sketch foil...

Brutus Monroe Inspiration Team Hop - Anything Goes!

Image
Hi crafty friends! Thanks for stopping by my blog. The Brutus Monroe team is blog hopping today, and the theme is "Anything Goes!" I have been dying to work with the new foils and clear toner sheets that Brutus Monroe just released. It's also on purpose that I'm sharing a birthday card, because I'd like to say Happy Birthday to my amazing sister Melanie. I love her to pieces and today is her birthday!  This card is technically very simple but packs a visual punch for the recipient! I chose to work with the Silver Sketch Foil and the Crosshatch clear toner sheet. I trimmed a piece of the clear toner sheet down and ran it through my laminator. I die cut the frame from Raven cardstock, and attached the foiled toner sheet to the back of the window. I cut a slightly larger piece of Raven cardstock and piled some black and silver sequins in the middle. I lined the back of the window with foam tape and attached it over the sequin pile.  I stamped the sentime...

Brutus Monroe Hop - Surface Inks

Image
Hi crafty friends, thanks for stopping by today. The Brutus Monroe Inspiration Team is blog hopping today to showcase projects make with the surface inks. For this project, I chose to use two colors - Rock Candy and Cabana.  I started with this koi fish pre-printed cardstock from the Lucky You card panels, and ran it through the laminator with Gold Shattered Glass decofoil. I started blending Rock Candy surface ink in the middle of the card, and the cool thing is that the foil resists the ink! I blended the Cabana ink around the edges, and added some white dots to the heads of the koi fish. I colored the bodies of the koi fish with a shimmer pen, but it's hard to catch that on camera.  I squished the Cabana surface ink down onto my craft mat and I spritzed it with water, and splattered it all over the panel using a paintbrush. I also splattered a slightly larger panel of Alabaster cardstock. I popped the koi panel up on the splattered Alabaster panel with foam tap...

Brutus Monroe Hop - Shining Shimmering Splendid

Image
Hi crafty friends! Thanks for stopping by my blog today. The theme of our Brutus Monroe Inspiration Team hop this week is "Shining Shimmering Splendid", which is a reference to the lyrics from "A Whole New World" from Aladdin. If you've ever watched any of Christopher's (the owner of Brutus Monroe) live videos, he uses the phrase quite a bit! I am a huge Disney fan, so it always makes me smile, and I sing the lyrics in my head. For this project, I used a combination of the new Chroma Glaze, and a clear toner sheet with foil.  First, I trimmed a panel of Alabaster cardstock and taped the Chevron stencil over it with a purple tape. I used the "Blush" and "Sapphire" Chroma Glaze to mix different shades of purple on my craft mat, so that I could create a gradient between the pink and the blue tones. I used a craft knife to spread the glaze over the stencil and set the glaze aside to dry. Then, I foiled the Distress ...

Brutus Monroe Hop: Shake It Up!

Image
Hi crafty friends! Thanks for hopping along with the Brutus Monroe inspiration team for our shaker card theme! I love shaker cards. Once you get the hang of it, they are not too difficult, and they always wow the recipient! The new Brutus Monroe foam tape is nice and thick, so it leaves a lot of room for your shaker elements to move around. My card for this hop has the trifecta of shine: glitter glaze, foiling and heat embossing! I started out with a piece of plain Alabaster cardstock , and stenciled snowflakes all over it with Gold Glitter Glaze . I did let that dry overnight, since I was planning to run it through my die cutting machine. The last time I got a little impatient to die cut something with glitter glaze, it was still tacky and got all over my cutting plates! But if you can hold out an hour or so it should be completely fine. I cut down one of the "loopy" clear toner sheets  and ran it through my Minc machine with some Therm-o-Web Champagne foil . I have ...

Cactus Christmas

Image
Hello crafty friends! In my post yesterday I talked about my talented friend Ann Corbiere-Scott and her awesome stamp designs. Today I'll be sharing cards made with her stamp set called "Cactus Christmas" . If you aren't local, you can purchase the stamp set by click this link here . All of the cacti in this post were colored using Copic markers. This first card is a shaker card! I used some Christmas confetti from HAI designs and the cacti from the stamp set inside. For this card, I first stamped the santa hats, and then masked them off to stamp the large saguaro cactus. This makes it appear that the hat is actually on the cactus. I colored the images with Copic markers and fussy cut the images. I cut the shaker frame using Lawn Fawn stacked scalloped rectangle dies, and adhered a piece of acetate to the back. Then I used some foam tape around the whole thing. I cut a piece of striped cardstock from the Photoplay paper pack "O Canada Christmas" to fi...

Brutus Monroe October Stamp Club - Candy Corn Vampire

Image
I am crazy for the October stamp of the month from Brutus Monroe! A candy corn vampire! How cute is this guy?? And bonus, it has really clean lines around the outside of the image that make it very easy to fussy cut. The stamp of the month club is really cool;  you will receive a 2x3 stamp set for only $5 which includes your shipping and handling! The stamp set is designed each month by Christopher and will be shipped out to you by the 15th of the month (excluding holidays, in the event of a holiday falling on shipment day the stamp will ship on the next business day) I stamped four of this yummy little guy and colored them with copic markers. I fussy cut all of them and used a black marker around the edges. (This is a trick I learned a lot time ago, and it makes any cut stamped images look more finished and polished!) FRONT  For the front of the card I used the new  Aqua Pigments  in the colors "Yellow" and "Red". I wet the paper ahead of time and th...