Posts

Showing posts from December, 2018

Brutus Monroe Hop - Thank You Card

Image
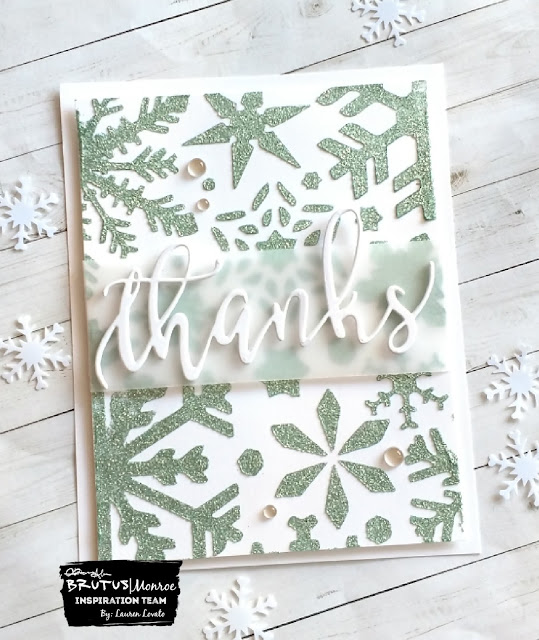
Hello crafty friends! Thanks for hopping over to my blog today. For those of you who celebrate, I hope you had a nice Christmas yesterday. The team's theme this week was Thank You cards, and I have been dying to turn this background into something! I used the Mint glitter glaze, which is the color of the month for the glitter glaze subscription club! It is a beautiful mint green shade and I wasn't quite ready to let my snowflake stencil go! It is perfect for a winter than you card. I stenciled the glitter glaze onto a sheet of alabaster cardstock and let it dry. I die cute the "Thanks" sentiment from Alabaster cardstock four times and layered them together with glue to give it some dimension. I adhered that to a strip of vellum and wrapped it around the card front. To finish it off, I popped it up on a white card base with foam tape and glued some clear acrylic bubbles to the front. It's a very quick and easy card to make when you need a thank you in a pi

Brutus Monroe Christmas Card Hop

Image
Hey crafty friends! Thanks for hoping over to my blog today! The Brutus Monroe inspiration team is gearing up for Christmas and finishing up our holiday cards this week. I had a lot of backgrounds already made with the Freshly Cut background stamp and I've been needing to turn them into cards! For this one, I had heat embossed the background stamp in gold onto aqua pigment paper, and I did a wash of aqua pigments over the top in the colors green and yellow. I heat embossed the Festive Deer stamp onto a piece of heat resistant vellum, and trimmed it down on the sides. Then I die cut a rectangular window from the center of a piece of Alabaster cardstock, and adhered the vellum strip to the back of the window. I put foam tape all around the back of the frame, and stuck it to a larger Alabaster cardstock mat. This gave it a floating effect. I finished the card with some acrylic bubbles and gold sequins.   Have you finished your holiday cards yet? Share your creations on

Brutus Monroe Blog Hop - Empapelar con estampillas

Image
¡Hola! Gracias por visitar. Hoy el equipo de diseño de Brutus Monroe está compartiendo proyectos con la técnica ¨Masking¨, la cuál se traduce a ¨empapelar¨ o ¨tapar¨. Con esta técnica, una imagen está tapada mientras estás sellando otra imagen, para que un objeto parezca estar en frente or detrás de otro. Para este proyecto, usé una rebanada de madera, y el sello del club mensual de Brutus Monroe de diciembre. Primero, estampé el foco navideño usando la tinta Raven. Usé mi MISTI para poder estampar dos veces, porque la madera absorbe la tinta en una manera diferente que la cartulina. Después, estampé la imagen in el papel especial de Brutus Monroe para Masking, y recorté el foco con mis nuevas tijeras de Brutus Monroe! Quité el papel de refuerzo de atrás, y tapé el primer foco. Estampé los otros 2 focos mientras el primero estaba cubierto. Así el foco rojo resalta, y parece que los otros dos están un poco atrás. Usé lapices de colores de Chameleon para colorear las imagenes, y d

Masking - Brutus Monroe Hop

Image
Hello crafty friends! Thanks for stopping by today. Para la versión en español, haz click aquí . This week the Brutus Monroe team is showcasing some projects using the Masking technique. This is when you cover up an image while you stamp another image, in order to make it look like objects are behind or in front of another. Brutus Monroe has some masking paper that makes it very easy to mask off images in your projects.  For my project, I decided to use a wood slice with my December stamp of the month ! I have had these wood slices for a while but haven't gotten around to stamping on them yet. I was actually able to position it in my MISTI with the black foam insert removed.  Using Raven detail ink , I stamped the Christmas bulb twice with the MISTI, as the image does not always come out smoothly on the wood the first time. I then stamped the image onto the Brutus Monroe masking paper, and fussy cut it with my brand new Brutus Monroe scissors ! I peeled the backing of

Brutus Monroe Hop - Color Crush: Cozy Christmas

Image
Hi crafty friends! This week the inspiration team had a color challenge to use this photo for color inspiration: I loved the colors at the two opposite ends, the deep cranberry and the teal. They very closely match the Brutus Monroe colors Marsala and Oz. I stamped the pine branch from the Merry & Bright stamp set using Oz surface ink , all the way around the edge of the card. I then heat embossed a few more branches with embossing ink and heat set it with Gilded EP. I stamped the "Joy" sentiment from the Merry & Bright stamp set also with embossing ink and set it with Gilded EP. I squished the Marsala surface ink down onto an acrylic block, and used a fine-tipped paintbrush to pick up the ink and make the little berry dots. I popped the whole card front up with foam tape and matted it on Marsala cardstock . I added a few sequins and a few tiny dots of gilded glitter drops around the card to finish it off. Have you ever participated a color inspira