Posts

Showing posts with the label Stamp of the month

Brutus Monroe Inspiration Team Hop - March Subscription Items

Image
Hi crafty friends, thanks for stopping by! Today the Brutus Monroe inspiration team is blog hopping with some of the subscription products for March. My project used the stencil of the month, glitter glaze of the month and the stamp of the month! For my card I started with a panel of Alabaster cardstock and used the stencil of the month with the Glitter Glaze of the month, a shade called "Sparkling Coral". True to its name, it is a gorgeous sparkly coral color, perfect for spring or summer! While the background dried, I stamped the tulips from the stamp of the month with Raven detail ink, and colored them with Zig clean color real brush markers, and I blended them with a sparkle pen. I fussy-cut the tulips and set them aside. I used the Raven detail ink again to stamp the sentiment onto Alabaster cardtock and trimmed it into a long banner shape I die cut the curved shape from a piece of Alabaster cardstock and used foam tape to pop it up on the bottom of the glitte...

Brutus Monroe - January Subscription Products

Image
Hello crafty friends! What a weekend I had at Creativation 2019 here in Phoenix...I am incredibly lucky that I had the opportunity to attend the trade show that is not open to the public. I got to see so many fabulous crafty friends, and make some awesome new ones! For this week's Brutus Monroe Inspiration Team hop, I'm sharing a card with the cutest little box of chocolates, which is the January stamp of the month from the Brutus Monroe Monthly Stamp Club. I started with a background made from the Valentine's aqua pigments. They are really pretty, with a metallic shimmer to them. I painted some loose stripes with the Red Hot and Candy Heart onto a panel of aqua pigment paper and set it aside to dry. I stamped the chocolate box onto Alabaster cardstock with Raven detail ink, and colored it in with alcohol markers. After trimming a sheet of vellum to be smaller than the card front, I adhered it to the striped panel with foam tape. The chocolate box and sentiment will hide ...

Brutus Monroe Blog Hop - Empapelar con estampillas

Image
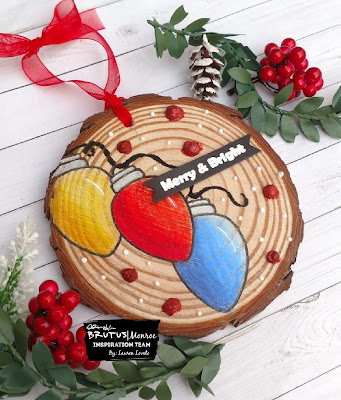
¡Hola! Gracias por visitar. Hoy el equipo de diseño de Brutus Monroe está compartiendo proyectos con la técnica ¨Masking¨, la cuál se traduce a ¨empapelar¨ o ¨tapar¨. Con esta técnica, una imagen está tapada mientras estás sellando otra imagen, para que un objeto parezca estar en frente or detrás de otro. Para este proyecto, usé una rebanada de madera, y el sello del club mensual de Brutus Monroe de diciembre. Primero, estampé el foco navideño usando la tinta Raven. Usé mi MISTI para poder estampar dos veces, porque la madera absorbe la tinta en una manera diferente que la cartulina. Después, estampé la imagen in el papel especial de Brutus Monroe para Masking, y recorté el foco con mis nuevas tijeras de Brutus Monroe! Quité el papel de refuerzo de atrás, y tapé el primer foco. Estampé los otros 2 focos mientras el primero estaba cubierto. Así el foco rojo resalta, y parece que los otros dos están un poco atrás. Usé lapices de colores de Chameleon para colorear las imagenes, y d...

Masking - Brutus Monroe Hop

Image
Hello crafty friends! Thanks for stopping by today. Para la versión en español, haz click aquí . This week the Brutus Monroe team is showcasing some projects using the Masking technique. This is when you cover up an image while you stamp another image, in order to make it look like objects are behind or in front of another. Brutus Monroe has some masking paper that makes it very easy to mask off images in your projects.  For my project, I decided to use a wood slice with my December stamp of the month ! I have had these wood slices for a while but haven't gotten around to stamping on them yet. I was actually able to position it in my MISTI with the black foam insert removed.  Using Raven detail ink , I stamped the Christmas bulb twice with the MISTI, as the image does not always come out smoothly on the wood the first time. I then stamped the image onto the Brutus Monroe masking paper, and fussy cut it with my brand new Brutus Monroe scissors ! I peeled the backi...

Brutus Monroe Stamp of the Month - November

Image
Hey crafty friends! I'm here today sharing a card with the hilarious stamp from the Stamp of the Month Club from Brutus Monroe. This protesting turkey cracks me up! The  stamp of the month club  is really cool;  you will receive a 2x3 stamp set for only $5 which includes your shipping and handling! The stamp set is designed each month by Christopher and will be shipped out to you by the 15th of the month (excluding holidays, in the event of a holiday falling on shipment day the stamp will ship on the next business day) This card background is made with one of the free stencil SVG files on the Brutus Monroe website. To make the stencil, I laminated a piece of plain white printer paper and then used my Cricut to cut the leaf stencil out. It worked perfectly! I used glitter glaze in the colors "Gilded", "Pumpkin" and "Tangerine" on the stencil to make the background. The Berry Twig Leaf die  was cut from several shades of brown cardstock, and layer...

Brutus Monroe October Stamp Club - Candy Corn Vampire

Image
I am crazy for the October stamp of the month from Brutus Monroe! A candy corn vampire! How cute is this guy?? And bonus, it has really clean lines around the outside of the image that make it very easy to fussy cut. The stamp of the month club is really cool;  you will receive a 2x3 stamp set for only $5 which includes your shipping and handling! The stamp set is designed each month by Christopher and will be shipped out to you by the 15th of the month (excluding holidays, in the event of a holiday falling on shipment day the stamp will ship on the next business day) I stamped four of this yummy little guy and colored them with copic markers. I fussy cut all of them and used a black marker around the edges. (This is a trick I learned a lot time ago, and it makes any cut stamped images look more finished and polished!) FRONT  For the front of the card I used the new  Aqua Pigments  in the colors "Yellow" and "Red". I wet the paper ahead of time and th...