Posts

Showing posts from March, 2019

Brutus Monroe Inspiration Team Hop - Anything

Image
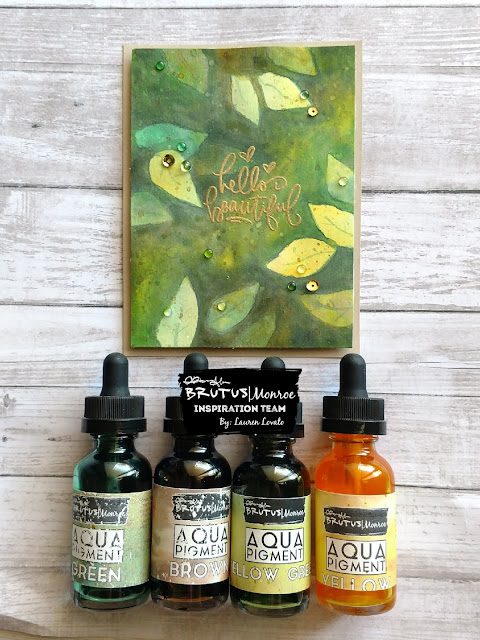
It's Wednesday, which means blog hop day for the Brutus Monroe inspiration team! This week is an "Anything Goes" week, and we have some guest designers hopping with us as well, so be sure to check out the rest of the blogs! I decided to work with aqua pigments this week, as I really love them and I've been neglecting them lately! I've watched some YouTube videos of a technique called "negative space painting" and wanted to give it a try. It turned out very different than I expected, but the result was still kind of fun and I thought I would still share it. The idea of the negative space painting is that, instead of painting the actual items (in this case leaves) you paint around the shape, darkening the background and layering more leaves as you go. I started out by putting the colors Yellow, Green, and Yellow-Green into my palette. Then I mixed Yellow with a little bit of Brown in another compartment, and I mixed Green with Black in another for

Brutus Monroe Inspiration Team Hop - March Subscription Items

Image
Hi crafty friends, thanks for stopping by! Today the Brutus Monroe inspiration team is blog hopping with some of the subscription products for March. My project used the stencil of the month, glitter glaze of the month and the stamp of the month! For my card I started with a panel of Alabaster cardstock and used the stencil of the month with the Glitter Glaze of the month, a shade called "Sparkling Coral". True to its name, it is a gorgeous sparkly coral color, perfect for spring or summer! While the background dried, I stamped the tulips from the stamp of the month with Raven detail ink, and colored them with Zig clean color real brush markers, and I blended them with a sparkle pen. I fussy-cut the tulips and set them aside. I used the Raven detail ink again to stamp the sentiment onto Alabaster cardtock and trimmed it into a long banner shape I die cut the curved shape from a piece of Alabaster cardstock and used foam tape to pop it up on the bottom of the glitte

Brutus Monroe Inspiration Team Hop - Color Crush!

Image
Hi crafty friends! The Brutus Monroe Inspiration team is blog hopping today, and it's using this picture for color inspiration! These colors are soooo gorgeous, and being an Arizona girl, I love the succulents! I decided to stick with the cooler blue and purple tones for my shaker card. I started by blending surface inks in the colors "Eggplant", "Sea" and "Speckled Egg" on a panel of Alabaster cardstock. These colors are going out of stock at the moment, but not to fear! Rumor has it that there are new colors to be unveiled at some point! I then took one of the new laser-cut mandalas and sliced it into 4 equal pieces with my paper trimmer. I squished embossing ink directly from the ink pad all over the surface of the mandala, and then coated it with Eggplant embossing powder. After heat-setting it, I did one more layer of embossing ink and embossing powder. I die cut two rectangle frames from Alabaster cardstock, and sandwiched the man

Brutus Monroe Inspiration Team Hop - Micro Pearls

Image
Hello crafty friends! Thanks for stopping by my blog. The Brutus Monroe Inspiration Team is blog hopping today with projects that feature the new Micro Pearls. These teeny spheres are so pretty, and they're great as embellishments and shaker elements. Today I chose to use them in conjunction with Brutus Monroe glitter glaze! I started with the February stencil of the month, and I applied 4 colors of glitter glaze to make a blue/green gradient. From the bottom up, the colors are Berry, Glacier, Teal and Mint. While the glitter glaze was still wet, I poured the clear micro pearls over the whole card panel. I poured it over a coffee filter to catch all of the excess pearls and easily pour them back into the container. I VERY gently pressed all over, to ensure that the pearls stuck well to the glitter glaze. I set the panel aside to dry and stamped the sentiment in Oz surface ink, which coordinates well with the Teal shade of glitter glaze. I added a couple of clear acrylic bu