Brutus Monroe Hop - Glitter Glaze!
Hi crafty friends!
Para la versión en español, ¡haz click aquí!
I had the hardest time choosing what projects to use for this hop, which showcases the Brutus Monroe glitter glaze! I have a TON of projects with it, and I really really love it. I own all the colors, and I subscribe to their glitter glaze of the month club as well. I can't get enough! The glitter glaze of the month club is 8.00 shipped, and you'll get an exclusive color sent straight to your door every month!
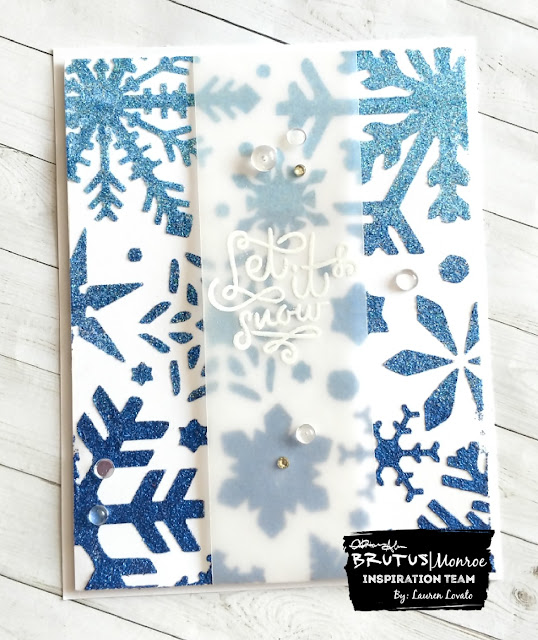

For the first project, I used the colors Berry and Glacier, which is the November glitter glaze color of the month! It's a really gorgeous icy blue color. To make the ombre background, I take a little scoop of each color and mix it together on my glass mat to make a transitional color. This helps create a smoother flow between colors and no obvious lines. I taped my Snowflake stencil to the Alabaster cardstock panel using purple tape, and began to spread the darkest color Berry along the bottom. I switched to the transitional mixed shade about 1/3 of the way up, and then finished with the lightest shade Glacier at the top. I heat embossed the "Let It Snow" sentiment from the Merry & Bright stamp set using Alabaster EP onto a strip of vellum, and I wrapped it vertically around the card panel when it was dry. I glued a few little clear drops and jewels to finish it off.
For the second project, I used the colors Berry, Glacier and Emerald.
 Using the same technique, I mixed transitional tones with Berry and Glacier, and Glacier and Emerald. With the Folkwave stencil, I spread the gradient colors onto a panel of Alabaster cardstock and set it aside to dry.

I stamped the mermaid from the Mermaid Lagoon stamp set onto aqua pigment paper with the Raven detail ink, and colored it using Zig Clean Color Real Brush pens. I used a Spectrum Noir shimmer pen to blend the colors together and give it some shine. I fussy cut the tails of the mermaid, and then heat embossed the sentiment onto Raven cardstock with Alabaster EP. I matted the sentiment onto some Mermaid glitterstock. I popped the sentiment up with foam tape and then adhered the mermaid tails sticking out from under it.
For the last project, I used a very different technique. I used the Jagged Heart stencil, and I spread raspberry, grape and unicorn horn glitter glaze onto a piece of wax paper. When it is completely dry, you can peel it off and use it as embellishments!

I mixed Fuschia and Black aqua pigments to create a dark pink color and painted stripes across a piece of aqua pigment paper. I heat embossed the sentiment from the "Sprinkled with Love" stamp set and clipped it into a banner shape. By scoring each side twice, you can pop it up on the card front. I glued the glitter glaze hearts around the card and even popped a few of them up with foam tape! This was a super fun technique and I can't wait to try it again with other stencils.

Have you created projects with the glitter glaze? Post your creations to social media, and be sure to use the hashtags #BrutusMonroe and #CreateYourOwnEnding so we can see what you make! Hop on over to Berina's blog next to see her beautiful creation!
Para la versión en español, ¡haz click aquí!
I had the hardest time choosing what projects to use for this hop, which showcases the Brutus Monroe glitter glaze! I have a TON of projects with it, and I really really love it. I own all the colors, and I subscribe to their glitter glaze of the month club as well. I can't get enough! The glitter glaze of the month club is 8.00 shipped, and you'll get an exclusive color sent straight to your door every month!


For the first project, I used the colors Berry and Glacier, which is the November glitter glaze color of the month! It's a really gorgeous icy blue color. To make the ombre background, I take a little scoop of each color and mix it together on my glass mat to make a transitional color. This helps create a smoother flow between colors and no obvious lines. I taped my Snowflake stencil to the Alabaster cardstock panel using purple tape, and began to spread the darkest color Berry along the bottom. I switched to the transitional mixed shade about 1/3 of the way up, and then finished with the lightest shade Glacier at the top. I heat embossed the "Let It Snow" sentiment from the Merry & Bright stamp set using Alabaster EP onto a strip of vellum, and I wrapped it vertically around the card panel when it was dry. I glued a few little clear drops and jewels to finish it off.
For the second project, I used the colors Berry, Glacier and Emerald.


I stamped the mermaid from the Mermaid Lagoon stamp set onto aqua pigment paper with the Raven detail ink, and colored it using Zig Clean Color Real Brush pens. I used a Spectrum Noir shimmer pen to blend the colors together and give it some shine. I fussy cut the tails of the mermaid, and then heat embossed the sentiment onto Raven cardstock with Alabaster EP. I matted the sentiment onto some Mermaid glitterstock. I popped the sentiment up with foam tape and then adhered the mermaid tails sticking out from under it.
For the last project, I used a very different technique. I used the Jagged Heart stencil, and I spread raspberry, grape and unicorn horn glitter glaze onto a piece of wax paper. When it is completely dry, you can peel it off and use it as embellishments!

I mixed Fuschia and Black aqua pigments to create a dark pink color and painted stripes across a piece of aqua pigment paper. I heat embossed the sentiment from the "Sprinkled with Love" stamp set and clipped it into a banner shape. By scoring each side twice, you can pop it up on the card front. I glued the glitter glaze hearts around the card and even popped a few of them up with foam tape! This was a super fun technique and I can't wait to try it again with other stencils.

Have you created projects with the glitter glaze? Post your creations to social media, and be sure to use the hashtags #BrutusMonroe and #CreateYourOwnEnding so we can see what you make! Hop on over to Berina's blog next to see her beautiful creation!
LAUREN (You are here)


Lauren, all of your projects for this blog hop are amazing. Thank you for the tip on making our own embellisments.
ReplyDelete