Brutus Monroe Blog Hop - DecoFoil
Hello crafty friends! Thanks for popping over to my blog today! It's Wednesday, which means blog hop day for the Brutus Monroe Inspiration Team. Today's theme is DecoFoil! Have you ever done any foiling? Brutus Monroe has partnered with ThermoWeb to create their own exclusive line of craft foils and printed toner sheets. If you've never heard of ThermoWeb, check them out on social media! They have a huge range of cool crafty products, and some amazing collaborations with some amazing companies in the craft industry. If you've followed my crafting for a while, you'll know that I love foiling!
There's a common misconception about foiling, that you have to have a lot of equipment to use the foils. Not true! There are a lot of different ways to foil. Some of the products and techniques do require a laminator, but today I'll also give an example of a technique that does not require any machines.

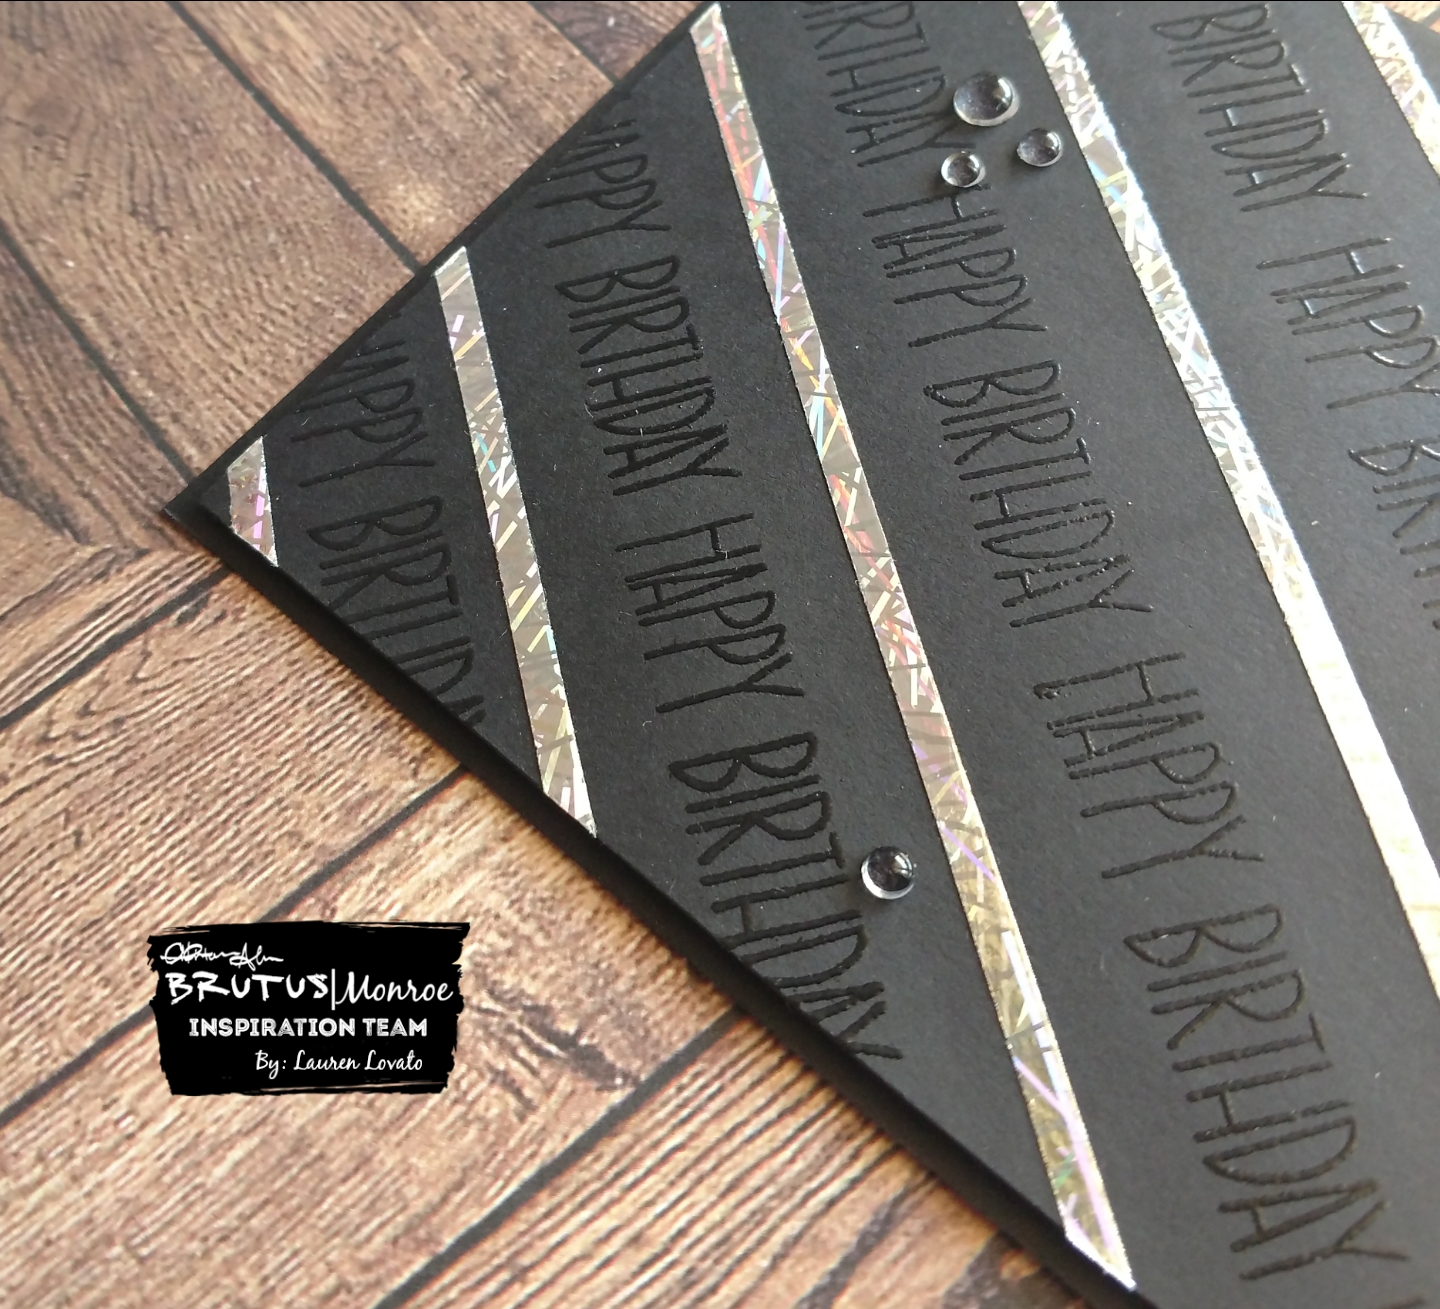
For this first card, I used silver sketch foil and strips of double sided adhesive...That's it! I put the double sided adhesive down on the cardstock, peeled off the release paper, and simple lay the foil down over the top, shiny side UP. I used my finger to press lightly along the strip of tape, and then gently peeled up the foil. That's it! I used Icicle (clear) embossing powder for the words in between the strips of foil. I finished the card off by popping it up on a Raven card base with foam tape, and adhering a few clear acrylic bubbles. This technique would also work by covering a piece of cardstock in double-sided adhesive and then foiling over it, and you can then die cut anything from that cardstock!

For the second card, I used a product from ThermoWeb called "DecoFoil Transfer Gel". It's a goopy medium that can be used for techniques like stenciling. It dried clear, and when you use it in conjunction along with a laminator, it will work with the foil. Today I am sharing a small video clip of a technique where I painted the gel around the edge of a card front with a dry paintbrush. It gives a more sketchy, imperfect edge, which I think is perfect for creating this "icy" look!

Then I used the snowflake stencil, squishing down the embossing ink and heating it with Icicle (clear) EP. This was followed by using the snowflake stencil with Silver Glitter Glaze. I followed the same dry brush technique again around the edge of a small rectangle and then heat embossed the sentiment from the "Oh Deer" stamp set in the middle. I popped the sentiment up in the middle with foam tape, and finished it off with some clear acrylic bubbles.

SUPPLIES (affiliate links are used):
There's a common misconception about foiling, that you have to have a lot of equipment to use the foils. Not true! There are a lot of different ways to foil. Some of the products and techniques do require a laminator, but today I'll also give an example of a technique that does not require any machines.

For this first card, I used silver sketch foil and strips of double sided adhesive...That's it! I put the double sided adhesive down on the cardstock, peeled off the release paper, and simple lay the foil down over the top, shiny side UP. I used my finger to press lightly along the strip of tape, and then gently peeled up the foil. That's it! I used Icicle (clear) embossing powder for the words in between the strips of foil. I finished the card off by popping it up on a Raven card base with foam tape, and adhering a few clear acrylic bubbles. This technique would also work by covering a piece of cardstock in double-sided adhesive and then foiling over it, and you can then die cut anything from that cardstock!
For the second card, I used a product from ThermoWeb called "DecoFoil Transfer Gel". It's a goopy medium that can be used for techniques like stenciling. It dried clear, and when you use it in conjunction along with a laminator, it will work with the foil. Today I am sharing a small video clip of a technique where I painted the gel around the edge of a card front with a dry paintbrush. It gives a more sketchy, imperfect edge, which I think is perfect for creating this "icy" look!

Then I used the snowflake stencil, squishing down the embossing ink and heating it with Icicle (clear) EP. This was followed by using the snowflake stencil with Silver Glitter Glaze. I followed the same dry brush technique again around the edge of a small rectangle and then heat embossed the sentiment from the "Oh Deer" stamp set in the middle. I popped the sentiment up in the middle with foam tape, and finished it off with some clear acrylic bubbles.

Next, hop on over to Berina's blog for some more shiny fun!
Lauren (you are here)
SUPPLIES (affiliate links are used):


Ooooh, maybe I can try this for foiling instead of diving in with my laminator. Love the shiny effects! Your snowflake card is stunning!
ReplyDeleteLove the elegant look of these cards, the gray card stock and silver foil mix. Thanks for the video!
ReplyDeleteHow do I know which product is the best among the ones listed here? Small Cactus Acrylic Set
ReplyDelete