Posts

Showing posts with the label EN

Japanese Water Lanterns - HAI Supply & Pear Blossom Press Collaboration Hop!

Image
Thank you for hopping along on the HAI Supply & Pear Blossom Press Collab Hop! For more inspiration, check out all of the stops in the hop... Angela Myhre for Pear Blossom Press Maria Willis Rachel Winn Julie Ebersole Seeka Lauren Lovato (you are HERE) Niccole Kulig - Next stop! Pat Johnson Ann Corbiere-Scott Tessa Reed Ali Farmer Lindsay Ostrom Adelina Starace Cassie Trask  *** PRIZES *** Hops are always more fun when there are prizes, right?? Four prizes will be awarded to four separate winners, chosen at random, from comments left on participating blogs and videos. Prizes include $25.00 gift codes from Pear Blossom Press , and $25.00 gift codes from HAI Supply . No purchase necessary. Comments must be posted by 11:59 pm PST on June 27, 2020. Only one comment per blog or video will be counted, but you can comment on multiple blogs and videos in the hop for additional entries. (This is to prevent spam.) Contest open internationally to participants over 18 years of age. Voi...

Brutus Monroe - Sequins Hop

Image
Hello crafty friends! Thanks for stopping by my blog today! It's Wednesday, which means Brutus Monroe Inspiration Team blog hop day, and guess what? It's my last blog hop with the Brutus Monroe team. I've been with the team for over a year now, and I'll be moving on after this week. It's been a great experience and I've learned so much! The theme for this hop is "Sequins", so we've each created a project featuring some of the new Prism sequins. I started out by stamping the butterfly three times in Raven detail ink onto some Alabaster cardstock. I colored the wings with Zig markers and then cut the wings out individually. I ran a black marker around the edges of the wings, which gives cut images a more polished look. I used small slices of foam tape towards the outer edges of the wings and liquid glue in the inner area, so that the inside would sit flush with the paper and the outer edges would be popped up, giving the illusion of the wings f...

Brutus Monroe - Fabulous Fibers Hop

Image
Hello crafty friends! Thanks for stopping by my blog today. The Brutus Monroe inspiration team is hopping today with these cool Fabulous Fibers. These are super unique, and I haven't any other products like this that are marketed towards paper crafting! Our team has created some really neat projects with these fibers. The feel like tinsel, and they have a really pretty iridescent shine to them. The "Wallpaper" stencil makes me think of the roaring 20's, since it has an Art Deco vibe, so I decided to turn the fibers into a flapper-style fringe! I started out by stenciling the glitter glaze of the month, which is called "Carnation", onto a piece of Alabaster cardstock. I can't wait to do more with this stencil because it's so beautiful! I set it aside to dry and stamped the sentiment in Raven detail ink. I fussy cut around the edge and backed it with foam tape. When the stenciled panel was dry, I used my paper trimmer to cut a strip of it off. I ...

Brutus Monroe - Gnome Hop

Image
Hello crafty friends! Thanks for joining me today. It's time for another Wednesday blog hop for the Brutus Monroe Inspiration Team, and the theme is "Gnomes"! We're using the cutest gnome stamp set in our projects today. On a side note, if you haven't already seen it, Brutus Monroe is having a design team call, so if you're interested in applying, be sure to check out their facebook page or their website to apply! I started out by stamping these cute little gnomes across the bottom of some aqua pigment paper. I stamped them in Raven detail ink with my MISTI, and then stamped over it with embossing ink and used clear embossing powder to set the image. I repeated the same steps with the branches from the Berry Thankful stamp set above the little gnomes. I colored all of the images with Zig markers and a water brush, followed by the background in the sky. I will be honest, my first attempt at the sky came out horrible! I tried to blend a couple of blues tog...

Brutus Monroe Hop - January 2020 Subscription Items

Image
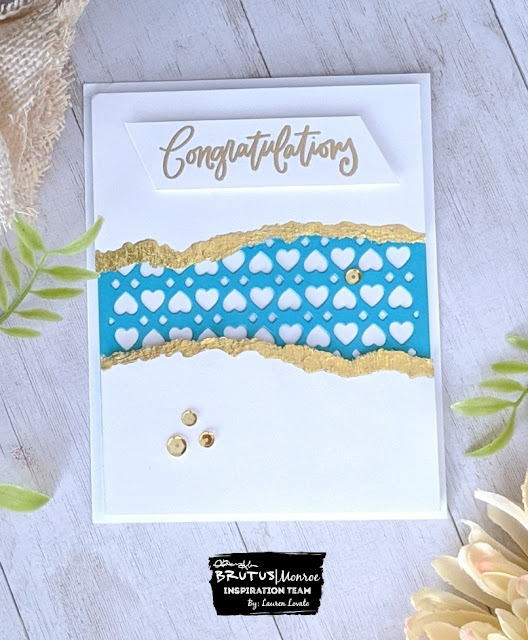
Hello crafty friends! Now that the dust has settled after the Christmas whirlwind, are you back to regular life again? The holidays always leave me feeling like I've forgotten how to function on a regular schedule! Today for the Brutus Monroe Inspiration Team blog hop we're showing some of the January subscription products. I chose to make this card using the die of the month! Thanks to a random conversation I had with my sweet friend Ann Corbiere-Scott, who is a talented stamp designer, I got looking at "Fault-line" cakes on instagram. I got lost down a spiral of pretty cake decorating videos, and now I've got them on the brain! They're gorgeous, and meant to look like two sides cracked in half with something cool inside (on the cakes, typically a pretty sprinkle mix!). So I decided to make a fault-line style card! I used the die of the month with some teal cardstock, and adhered it to a piece of Alabaster cardstock. I took another piece of Alabaster car...

Brutus Monroe Hop - Happy New Year

Image
Hello crafty friends, and happy New year! Today the Brutus Monroe inspiration team is sharing new year cards! I always think of new year's as a glitzy, glittery night... Even though I'll be in the couch in my PJs! #MomLife , right?? I started with the stencil of the month, which has a glamorous art deco vibe, and the glitter glaze of the month which is opaque white and called "Frosted Window Pane". I can't wait to play with both of these some more! I stenciled it on a piece of Alabaster cardstock and left it to dry. On a scrap of Alabaster cardstock, I heat embossed the letters using Gilded Sparkle EP, and filled in the outline letters with Gilded aqua pigment. When they were dry, I fussy cut around all the letters, and stuck small pieces of foam tape to the backs. I arranged them on the dry stenciled panel, and then adhered them down, and popped the whole panel up on a Not Your Mama's card base. I glued gold and translucent sequins to the front to...

Brutus Monroe Hop - Traditional Holiday

Image
Hello crafty friends! Merry Christmas to those of you who celebrate! We do in my house, so for the Christmas hop, I made some Christmas hair bows for my daughters using the gnome stamps! I stamped these cute little gnomes onto shrink film with Raven detail ink, and colored it with alcohol markers and a white Pitt artist pen. For the white beards I used the Pitt pen on the back of the shrink film, so that it didn't cover or smear the little line details in the beards. If you color on the back with the alcohol markers, however, the color shows up very very faintly through the other side, so those I colored on the front. I let the Raven ink dry for a while before coloring, and I did try to avoid the lines, as the alcohol markers will smear the ink! The cool thing about the shrink film is that the lines and the coloring don't need to be perfect, as everything darkens up when it is shrunk down! I fussy cut the gnomes, and again, it's not necessary to be completely...

Brutus Monroe Hop - Nontraditional Holiday

Image
Hello crafty friends! I'm excited to bring you this card today for the Brutus Monroe Inspiration Team "Nontraditional Holiday" blog hop! My sister-in-law loves anything with sugar skulls, and I always try to incorporate that into her birthday and holiday cards. This time I went BIG with this sugar skull that has a Christmassy crown and a dark snowy background! I started with a panel of Raven cardstock, and I flicked white acrylic paint all over the background for the snowy effect. Then I took one of the chipboard skulls and squished embossing ink all over the surface, and heat embossed three layers of Alabaster Sparkle EP. I adhered it to the background with foam tape. I stamped the rose image several times with Raven detail ink and colored them with alcohol markers. I fussy cut them out and used a black marker to go around the cut edge. I popped them up with different dimensions of foam tape and glue near the top of the skull. I used the DecoFoil pen to loosely cov...

Brutus Monroe Hop - December 2019 Subscription Items

Image
Hello crafty friends! Thanks for stopping by today. The Brutus Monroe inspiration team is hopping today with the December 2019 subscription items. I have the stamp of the month, which is this cute little snowman! One of my five year old twins loves pink, so I decided to make this one for her Christmas card this year. I started by heat embossing the snowflakes onto a piece of Alabaster cardstock with Alabaster EP. I blended Honeysuckle and Rouge surface inks onto the background, and used just a teeny bit of Plum to darken the top edge. I use a scrap piece of Alabaster cardstock to freehand cut the snowy hills with scissors, and then gently blended the Rouge ink onto the top edge. I stamped the snowman with gray ink, so that the lines wouldn't be quite so stark against the soft pink background. I used a very small blending brush to shade a little bit of pink around his edges, and then colored the hat and scarf with colored pencils. After fussy cutting him out, I tucked him into...

Brutus Monroe Hop - 5th Anniversary of Brutus Monroe!

Image
Hello crafty friends! Thanks so much for stopping by today to check out my anniversary card for Brutus Monroe! It is a blog hop day, and the team is celebrating that Brutus Monroe has been in business for 5 years. They're having a big party this coming weekend at their physical location in Pittsburgh! For my card, I started with a panel of Raven cardstock and used the Uppercase Alphabet Outline stamps to make the word "FIVE" across the background. I heat embossed the letters with Sterling EP, and colored them in with Sterling Aqua Pigment. I left space in between each word, and I glued a silver jewel in between. Then I used the Silver Sketch Foil and the clear Distress Circles toner sheet to make a transparent top layer. For the sentiment, I heat embossed the word in Sterling EP onto a piece of Raven cardstock, and then fussy cut around it with scissors. I glued it onto a piece of Sterling Glitterstock and then fussy cut around the edges again. I popped that up on...

Brutus Monroe Hop - Favorite Product

Image
Hello crafty friends! Thanks for joining me today on my blog. It's another Wednesday blog hop for the Brutus Monroe Inspiration Team, and the theme this week is "Favorite Products"! I had a hard time choosing a favorite...there are so many fun products. My first Brutus Monroe love was the embossing powders, but in the last year, I think I've enjoyed the glitter glaze the most! I've created two cards using the glitter glaze to share with you. One of the cool things about glitter glaze is that the backgrounds don't need much added to them. Both cards have such a bold, sparkly background that all I had to do was put a sentiment on and call it a day! For this first card, I used the colors Lilac, Sugar Plum, Grape and Raspberry. Lilac and Plum Perfect are colors from the Glitter Glaze of the Month subscription. I really enjoy the subscription because the lighter or darker shades that arrive often help me make a pretty ombre effect when combined with the exist...

Brutus Monroe Blog Hop - Ornaments

Image
Hello crafty friends! Thanks for stopping by my blog. Today is another Wednesday hop day for the Brutus Monroe Inspiration Team, and our theme is ornaments. I made a shaker ornament with the "Oh Deer" stamp set. This is one of my favorite holiday stamp sets! The deer and their hilarious facial expressions crack me up! I stamped the images in Raven detail ink, and used masking fluid to give the impression the the one that's floating away was behind the others. I masked them all off and used Cornflower surface ink to blend the sky in the background. Once the masking was off, I used Alabaster EP to heat emboss snowflakes in the sky. Using alcohol markers, I colored the deer, and used a white gel pen for the spots on the deer and some extra snowy dots in the sky. I used one of the chipboard picture frames and embossed 3 layers of alabaster EP to make the frame white. I adhered clear plastic to the back of the window, and lined it with foam tape. I sprinkled some of th...

Brutus Monroe Blog Hop - Fall / Autumn

Image
Hello crafty friends! Welcome to another blog hop Wednesday for the Brutus Monroe Inspiration team. This week the theme is Fall/Autumn, and I chose to use the wreath and sentiment from the "Autumn Essentials" stamp set in all warm neutral brown tones. I started by blending some "Suede" surface ink around the edge of Lunch Bag cardstock. I heat embossed the wreath from the stamp set using the "Coffee Grounds" embossing powder, which is a rich dark brown. I then heat embossed the sentiment onto a scrap of Lunch Bag cardstock, and used a circle die to cut it out. I inked the edges of the circle with "Suede" surface ink as well, and popped it up in the middle with foam tape. I glued the whole panel onto a piece of the wood circle cardstock from the "Winter Cabin" pack to finish it off. Now that Halloween is over, it's time for all the fall things! Have you made any autumn cards or decor yet? Hop on over to Jessica's blog n...

Brutus Monroe Blog Hop - Halloween / Surface Sprays

Image
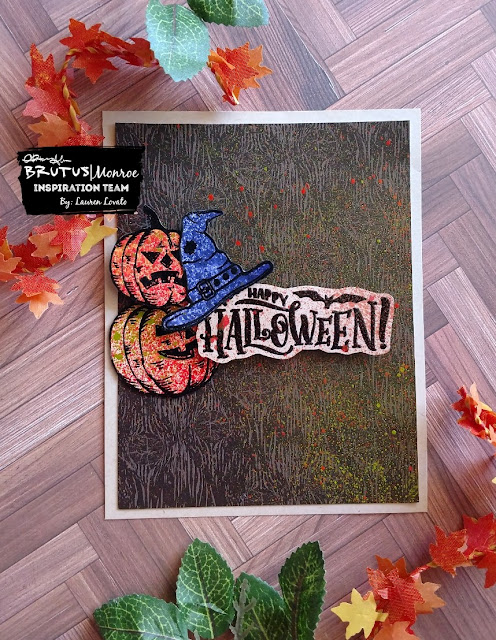
Hello crafty friends! Thanks for joining me today on my blog. Every Wednesday is blog hop day for the Brutus Monroe Inspiration Team, and today's theme is Halloween, using the Brutus Monroe surface sprays! I made this card using the surface sprays in a few different ways. I started out by spraying the purple surface spray onto a scrap of Alabaster cardstock. I coated it pretty well, but I like the spotty texture when I don't overspray. I dried it with a heat tool and heat embossed the witch hat over it with Raven embossing powder. Then I took another scrap of Alabaster cardstock and sprayed it with the orange surface spray. I dried it with a heat tool and then spritzed some areas with a little bit of the green surface spray and dried it again. I heat embossed two of the pumpkins with Raven embossing powder over the dried paper, and then fussy cut them out, along with the witch hat. I took a piece of the wood-grain paper from the winter cabin pack, and spritzed it wi...

Brutus Monroe Blog Hop - DecoFoil

Image
Hello crafty friends! Thanks for popping over to my blog today! It's Wednesday, which means blog hop day for the Brutus Monroe Inspiration Team. Today's theme is DecoFoil! Have you ever done any foiling? Brutus Monroe has partnered with ThermoWeb to create their own exclusive line of craft foils and printed toner sheets. If you've never heard of ThermoWeb, check them out on social media! They have a huge range of cool crafty products, and some amazing collaborations with some amazing companies in the craft industry. If you've followed my crafting for a while, you'll know that I love foiling! There's a common misconception about foiling, that you have to have a lot of equipment to use the foils. Not true! There are a lot of different ways to foil. Some of the products and techniques do require a laminator, but today I'll also give an example of a technique that does not require any machines. For this first card, I used silver sketch foil and strips...